
By Aymée Jocelyne of Bright Hills
Executive Summary
I built a round bonnet, a pointed bonnet, and a gabled bonnet, from the reign of Henry VII. I built the bonnets out of separate components, and then assembled them with pins. This allows me to swap the various components and obtain dramatically different looks with only three basic bonnets.
What They Did / Used
- ‘Sipers’ Linen Pasteboard
- ‘Wyire’ (copper?), covered by silk ribbon
- Black Silk Velvet Fabric
- Silk Black Velvet or Satin Frontlet
- Gold & Precious Jewels on Silk Taffeta
What I Did / Used
- Homemade Linen Pasteboard__
- Millinery wire & cotton flannel
- Black Poly Velvet lined in Black Poly Taffeta
- Black Poly Velvet Frontlet, lined in Tawny Taffeta
- Faux pearl, gold DMC, beads & buttons
What you changed and why: For budgetary reasons, I did not use silk velvet, silk, satin, or precious jewels. I tried my best to only use items I already had in my fabric and craft storage with just a few exceptions. I attempted to make my own linen buckram, but used an acceptable modern stiffening substitution already in my kitchen pantry.
What went wrong / What I learned: There are things I would rework on the gold frontlet, and I might try stiffening the frontlets. I might use a different construction technique or fabric if I remake my round bonnet, and I would add wire to the front of the pointed and round bonnets.
I began my research into late 15th century English bonnets when I decided to recreate the gabled bonnet worn in a portrait by Elyzabeth of York. In Elyzabeth of York’s Wardrobe Accounts, William Stafford is instructed to go to London to “Lokke for bonnettes for the Quene.’ In fact, when it comes to the term ‘hood,’ the wardrobe account states: “Be it remembered that none may weare hoodes, under the degree of au esquire of the King’s household, but only tippets of a quarter of a yard in breadth, except in time of need.” While this excerpt is discussing court dress requirements for men, the term ‘hood’ is clearly associated with a poor/less desirable item of clothing, while a bonnet is a head covering.
While researching period images of the gabled hood, I noted that many of the bonnets had very different styles at the back of the hat. There were three recurring bonnet styles for noble ladies in the late 15th century. I could not find period terms to distinguish between the three hat styles. To avoid confusion, I will refer to the bonnets as round bonnets, pointed bonnets, and gabled bonnets. When I finished constructing the gabled bonnet, the headdress was made of 5 different pieces/components that I pinned together to create the hat. It occurred to me that many of the pinned components that I made for the gabled bonnet could be used with the other two bonnet styles.

Why Late 15th Century Bonnets?
Although I have not yet passed my two-year anniversary with the SCA, I have been making historical costumes from later eras for 20 years. I’ve recently developed a chronic health issue which makes cutting out and sewing an entire gown very challenging. Prior to this project, I had made less than five hats. I have found hats are a physically smaller projects than gowns, and can comfortably be cut out at a table instead of my floor. The fact that most period hats/bonnets need to handsewn means that I can sit in a comfortable chair and sew in front of the TV. An added bonus is adding a headdress to garb packs a powerful impression.
I chose the late 15th century because the fashions under the reign of Henry VII are easily overshadowed by his predecessors and successors. It’s difficult for the relatively demure bonnets of the late 15th century to complete with the flashy butterfly hennins under his predecessors, or the flashy French and Gabled hoods during his son Henry VIII’s reign. Beyond having a reputation for being a miserly king with a domineering mother, little is commonly known known Henry VII reign (unless the individual really loves English history). The fashions of the late 15th century, as England transitions from the late Gothic medieval era to the Renaissance, is a delightful jumble of new and old. Why did English ladies move away from the colorful and large butterfly hennins of Richard III’s reign, to primarily black bonnets? I found no evidence of the boxy gabled bonnet or the very fancy version of the pointed bonnet on the continent: they appear to be a uniquely English style. In addition to shining a small spotlight on these overlooked fashions, I generally find that I understand historical items better once I make and wear them.
Project #1: A Late 15th Century Round Bonnet

The round bonnet appeared in Europe around the same time ladies started wearing what is modernly known as a henin. It was possibly the evolution of the open hood. On the continent, younger women appear wearing round bonnets while the court ladies wear steeple henins. In England, the round hood appears around the same time as the butterfly henin. The bonnet can have an added frontlet, or be folded back to show the lining. The bonnet is round at the back of the skull, and a veil or two lappets trail down the back.

Figure 3. Detail from Writhe’s Garter Book: the Ceremony of the Bath and the Earldom of Salisbury Roll. From the British Library Manuscript Collection. Reference Number unknown due to ongoing cyberattack of the British Library website.
This image of Elyzabeth Woodville and her ladies depicts English truncated henins rather than round bonnets. The frontlet worn with the round bonnet is largely unchanged from the style worn with the henin. I was unable to find any images of English round bonnets or frontlets made from colorful fabrics. French manuscripts depict vibrantly colored round bonnets, so it is possible that English round bonnets could have also been made with colorful fabrics. However, the wardrobe accounts of Elyzabeth of York and Lady Margaret, the King’s mother, make it clear that the dominant fabric for bonnets was black velvet, so that is what I chose to use.

Figure 4. Vaux Passional, Peniarth MS 482D, f. 9r. Circa 1503. This detail of the illuminated miniature depicts Margaret Tudor and Mary Tudor.
This is an early 16th century manuscript depicting the royal family in mourning after the death of Elyzabeth of York. Both Margaret and Mary wear black round bonnets. Princess Margaret, who is facing the reader, is wearing a wire frontlet on her forehead. She also has a gem pinned to her frontlet, which is similar to several English brass effigies as well as contemporary images from the continent. The back of Princess Mary’s bonnet is clearly visible, and it appears that the back of the bonnet is sewn in one piece rather than two lappets.
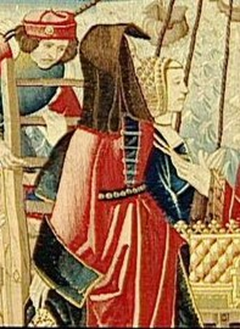
Figure 5. Tapestries of the Story of St. Etienne, Tapestry, circa late 15th and early 16th century, commissioned by Jean III Baillet, bishop of Auxerre (1477-1513), Inventory no. CL. 9930, CL. 9938, CL. 20200, CL. 20201, Musée Cluny, Paris, France.
This St. Etienne Tapestry detail shows the back of a French lady’s gown and an excellent view of the split seam of her round bonnet, creating two separate lappets. I was unable to find any English images which featured round bonnets from the back. However, wearing a lappet pinned up is reminiscent of later Gabled bonnet styles. Several Holbein drawings show wearing the lappet turned up, as well as the famous portrait of Queen Jane Seymour.

Figure 6. Detail from Book of Hours, Belgium, ca. 1490, MS S.7 fol. 249r
In the Book of the Hours featuring a pair of dancing couples, we get a lovely front and back view of a round bonnet. The lappets appear to angle away from the back of the head, forming an upside down ‘V.’ In this image, the lady is wearing a brooch on one of her lappets. While unable to definitively say whether or not English round bonnets looked like this from the back, it is one possibility.

Figure 7. Funeral Monument, Unknown artist, Mirabel Sulayard c.1500, All Saints, High Laver, Essex, UK.
All the English paintings of round bonnets I found were all black, but the funeral brasses and monuments I found hinted at a wide array of textured fabrics and silks. The majority of the bonnets are decorated by adding a contrasting/fancy frontlet. This image is different because it also depicts using a fancy fabric for the round bonnet itself. There is something on the frontlet of this monument: it could be an imperfection in the stone, or it might depict a small jewel the lady has pinned to her frontlet.
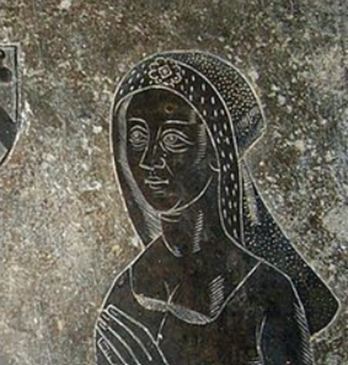
Figure 8. Funerary Brass, artist unknown, Elizabeth Mauntell, c. 1487, Nether Heyford, Norhtamptonshire, UK.
The Round Bonnet of Elizabeth Mauntell is another example of textured fabrics being used on the round bonnet. Elizabeth Mauntell has a gem pinned directly the center of her round bonnet. This is the only example I have found where there is a brooch at the center, as opposed to the side of the frontlet. Note the smooth appearance of the rounded part of the hood.
The dotted texture on the frontlet most likely depicts fur. The wife (name, unknown) of William Derby’s funeral brass circa 1498 at St. Luke’s in Gaddesby, Leicestershire also features a frontlet made of fur. The woman’s dress collar, which was frequently made of fur, matches the pattern on the frontlet.
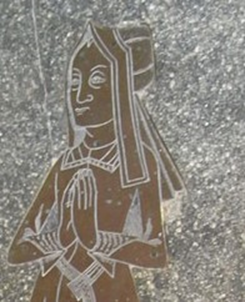
Figure 9. Funerary Brass, unknown artist, c. 1500, Alice Twynho, St Mary’s parish church, Fairford, Gloucestershire, U.K.
Here we have our first example of a round bonnet with a gabled front. The way the round hood is made, it is possible to pin the front over the gabled paste and create a pointed shape at the front of the bonnet. This funeral brass is also helpful because it shows the seam lines of the round hood. With no references on how these bonnets were constructed, there are two primary schools of thought on how the round bonnet is made: gathering the back or creating half a sphere by sewing together gores.
Round Bonnet Construction
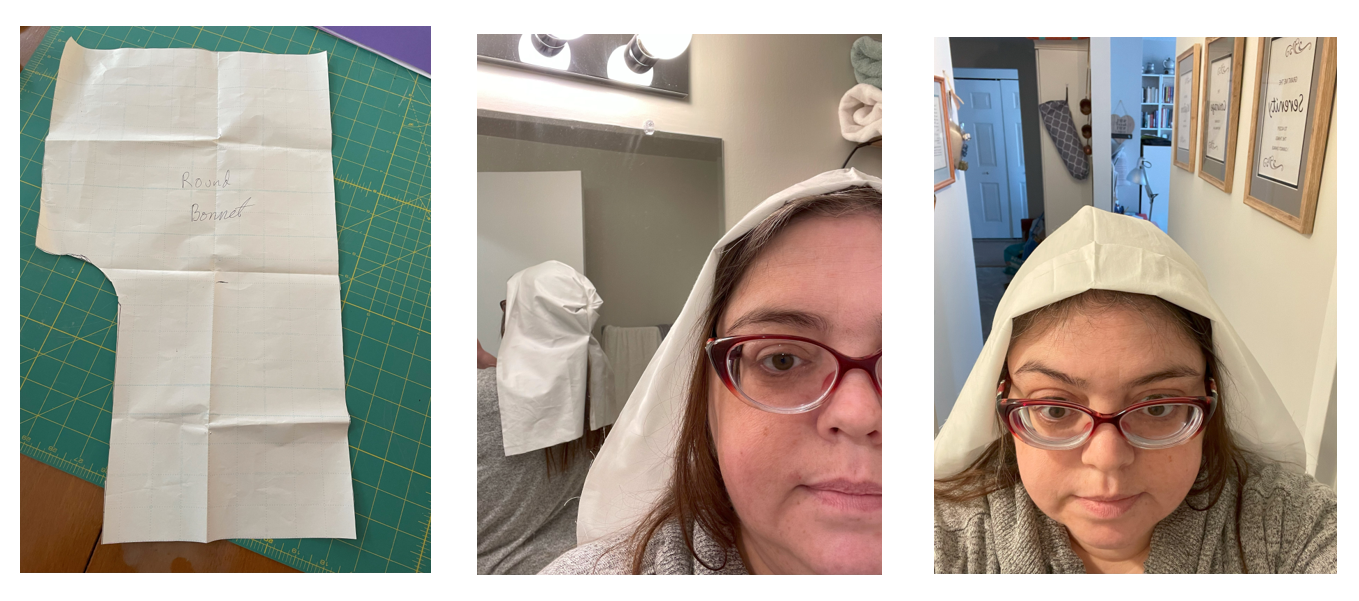
To begin with, I decided to start with the round bonnet pattern found in Caroline Johnson’s The Queen’s Servants. Rather than using gores to create the round shape of the bonnet, I decided to gather the back. The Queen’s Servants also advised sewing up the seam in the back to form a single veil in the back: I decided to leave the seam open and create two separate lappets. I made a quick muslin which fit, but I realized I wasn’t happy with the length of the lappets.
Next, I traced and cut out the velvet fabric and linen lining. I used the muslin as my pattern, added seam allowances using tailor’s chalk, and added 6 inches in length to the lappets. I chose to use a synthetic black velvet rather than the period correct silk or silk velvet for financial reasons. For the lining, I chose 100% black linen and cut out the same pattern pieces. Although it is plausible that silk was used to line the lappets, especially if one wearing a lappet flipped up, the inner part of the hat would most likely be linen. Linen doesn’t shift on the head and is inexpensive to replace if the lining gets dirty.

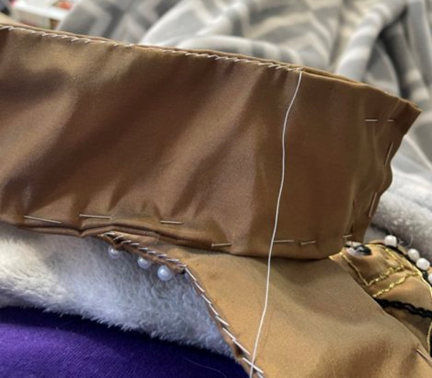
The Round Bonnet was completely sewn by hand. Silk or linen black thread would have been more period correct, but due to time and financial constraints, I used black Gutterman thread. I started with a backstitch to close the small neck portion of the bonnet (marked in yellow on photo). Next, I began gathering the back of the bonnet which will create the round look.

After running a second set of gathering stitches, I pulled the threads taut until the back of the round hood was closed. The third photo is the interior of the unfinished bonnet.
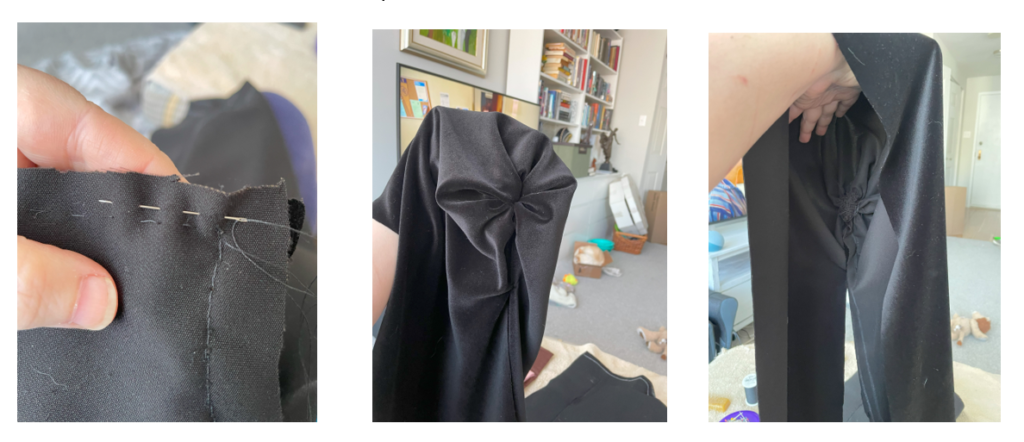
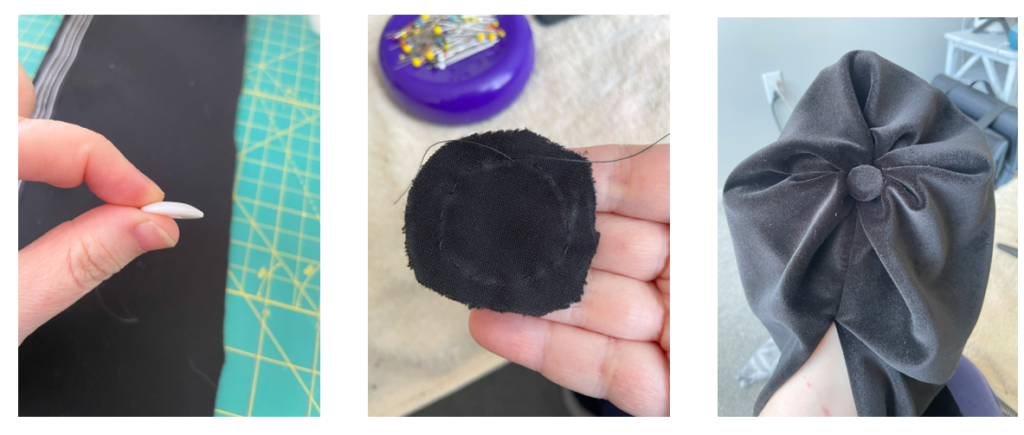
To finish the back of the round bonnet, I made a covered velvet button. Although not included in the period images, I did locate one funeral brass which showed a button on the back of the hat. A flat wooden disk would have been a more period correct solution, but I didn’t have any in the sewing stash, so I grabbed a button, turned it so the flat side would face outwards, covered it in the black velvet, and attached it to the center of the bonnet.
One quick fit check in the bathroom mirror before moving on to sewing in the lining. This was the point in the project where I began to regret my fabric choice. I had paid a bit extra to get the ‘nice’ synthetic velvet. Unfortunately, this translated into thin/slinky fabric. The middle photo below shows that I had an incredibly hard time getting the linen pinned to match the velvet pieces. On one side, the linen was an inch short, on the other side it was four inches short. But simply unpinning and trying again, and then again, I eventually pinned the velvet into submission!

The last step was sitting in my comfy chair and using a whip stitch to sew up the hat and lining. I tried to make sure that the linen was slightly smaller than the velvet so it would not be visible while wearing the round bonnet.
Round Bonnet Brooch: I had a green brooch in my costume jewelry and I wanted to use as my lappet gem. I also wanted to make make sure the gem for the round bonnet represents my Barony. Special thanks goes to Dame Alexandria Wright who made me a pair of earrings featuring the crescent moon of Bright Hills, as well as a black bead representing the sable on our coat of arms. The metal earring hook was sacrificed and bent around the green brooch due to time constraints. This is my first venture into jewelry making, and I’m happy with the look of the pin.

Round Bonnet Accessory: Wired Frontlet
In the Pageants of Richard Beauchamp, Queen Joan of England is depicted wearing a henin with a butterfly veil, while her ladies are wearing round hoods. Note the wire frontlet visible at the foreheads of the ladies wearing round hoods. Queen Joan was consort of England from 1403 to 1413. However, the style of dress and bonnets are more reflective of the 1470-1480’s England. Calum Cockburn, who maintains the Medieval Manuscript Blog at the British Library, states the manuscript was probably commissioned by Anne Beauchamp, widow of Richard Neville ‘the Kingmaker,’ between 1483 and 1492.
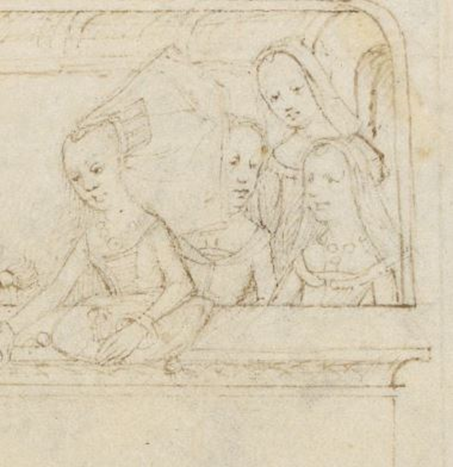
Figure 12. Beauchamp jousting in Queen Joan’s coronation tournament, in the Pageants of Richard Beauchamp, Cotton MS Julius E IV/3, f. 3r
Using a pattern loosely taken from The Medieval Tailor’s Assistant and scrap black velvet from the round bonnet, I started construction of the wired frontlet. Because my millinery wire did not seem sturdy enough for a wired frontlet, I used waxed white linen thread to wrap 3 pieces of wire together. My linen thread is white and wouldn’t be seen which is why I used it here but not on other portions of the project. In the 15th century, the wire most likely would have been made of brass or copper and wrapped in a ribbon.

I curved the ends of the wire and then used a small strip of velvet to encase the wire loop. Once the velvet covered the wires, I stretched the wire to fit my forehead. Next up, I took my precut velvet frontlet piece, and hemmed around all the sides.

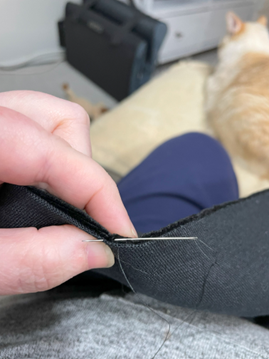
Once the edges of the frontlet are tacked down, it is folded in half and whipped into place. What is not visible in the first image are two pins marking where to stop the stitches and insert the covered wire. On each end of the frontlet, two linen twill tapes were inserted in order to tie the frontlet around the head. The middle picture is the most period correct step in this project: rescuing the fancy covered wire from the evil cat who destroys any fabric or sewing implements he encounters. The last step is inserting the velvet covered wire and stitching down the remaining opening.

Round Bonnet Lessons Learned:
- Fabric selection matters. I used a much cheaper velvet to make my pointed and gabled bonnets. The premium velvet I used for the round bonnet was slinky and thin. If I were to make it again, I’d see if I could find some cotton velveteen, or default to the cheaper velvet. If I ever use silk to construct a round bonnet, I would need to consider adding a canvas interfacing.
- Construction techniques matter. Next time, I would like to try out the gored construction approach: on this approach the back of the bonnet is rounder, and it would also allow me to attach the lappets separately and achieve the pretty upside down ‘V’ look in the back.
- Stiffening materials should be generously used, adding canvas or buckram to thin fabrics, and also possibly using millinery wire to frame the face of the front of the bonnet.
Next time, I would love to have enough time to make a fur frontlet.
Project #2: A Late 15th Century Pointed Bonnet
Perhaps because the pointed hood is visually odd to the modern eye, I was especially excited about making this project. When I first started, I was convinced that at best I would achieve a goofy looking hat. That was ok with me: I tend to like wearing headdresses that stand out. The hat by itself is a definitely a nod to the Smurfs, but once I added the silk organza tippet and velvet frontlet, I fell in love with the pointed bonnet.
The origins of the English Pointed bonnet can be traced back to the 14th century, when women wore wool pointed hoods. In this English illumination, a woman is wearing a pink wool hood lined in white linen. These bonnets were warm and practical.

Figure 13. Detail from fol 33r of the Luttrell Psalter (BL Add. MS 42130), c. 1330
In the manuscript commissioned by the Earl of Warwick “Kingmaker’s” widow, ladies attend the coronation of Queen Joan. I spotted two pointed bonnets and drew a line along the top of the hat in blue to make them more visible. This is a helpful reference, as it tells us that the pointed bonnet is no longer an everyday item, but fancy enough to wear to a queen’s coronation.
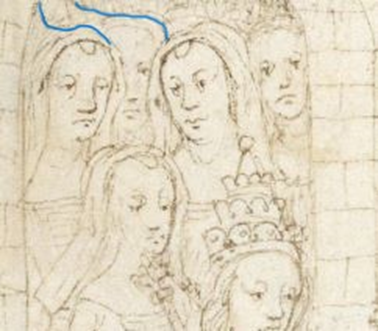
Figure 14. The Queen’s coronation, Cotton MS Julius E IV/3, f. unknown due to ongoing cyberattack against the British Library’s digital manuscript collection.
This is the only illumination in color that I was able to find, and it is a French manuscript. However, the image is an excellent period illustration of what the basic pointed bonnet, without any frontlets or tippets, looks like. We can tell by the lady’s silk attire that she is someone of means. The black hood’s front has been folded back slightly, the front of the hood drapes around the wearer’s face, and it comes to a point in the back. This 15th century manuscript shows that the pointed bonnet has become a more refined hat as opposed to the earlier wool hoods. The pointed bonnet featured here is most likely made out of black silk or black velvet.

Figure 15. Book of the Hours, France, perhaps Pris, ca. 1475 MS S.5 fol. 22r
This Ipswich funeral brass was produced in Flanders, but it has an excellent view of pointed bonnets worn with frontlets. Although it was made around 1525, the depicted fashions seem to be from two decades earlier. In this image, the pointed bonnets are elaborately embroidered and covered with pearls/gems.

Figure 16. Detail of the continental brass to Thomas and Emme Pounder and Family, 1525, St. Mary Quay Church, Ipswich. Now located at Ipswich Museum.
I was initially inclined to dismiss the heavily embroidered pointed bonnets of the Ipswich Pounder Brass, but this rubbing of a brass effigy also features extensive embroidery. In addition, this image shows two additional ways to wear the pointed bonnet. According The Queen’s Servant’s, the veil worn over the bonnet is called a tippet, and it is held in place for an added frontlet. The second alteration to the pointed bonnet is mounting it on top of a gable paste to create a gabled shape in the front.

Figure 17. Detail of Brass effigies rubbing of unknown man & wife, c.1530-40, Church of St Mary & All Saints, Little Walsingham Norfolk
In this funerary brass, we can see the pointed bonnet with the round front and tippet worn over the pointed hood. In all the English images, the tippet worn over the pointed hood is sheer. Elyzabeth of York’s wardrobe accounts mention a “sarcenet” tippet for the Queen. Bonnets are not mentioned in the Wardrobe Accounts of the Queen, because the ladies would make their own bonnets. The necessary brass pins, thread, and ribbons were purchased from the Silkwomen’s wares.’ Tippets were most likely very fine starched linen (white or possibly black), or a very fine silk. White sewing silk was issued by the wardrobe to sew/hem tippets.

Figure 18. Jone Wyddowsoun d.1513, wife of Wyllyam, St. Michael’s Church, Mickleham, Surrey
Pointed Bonnet Construction
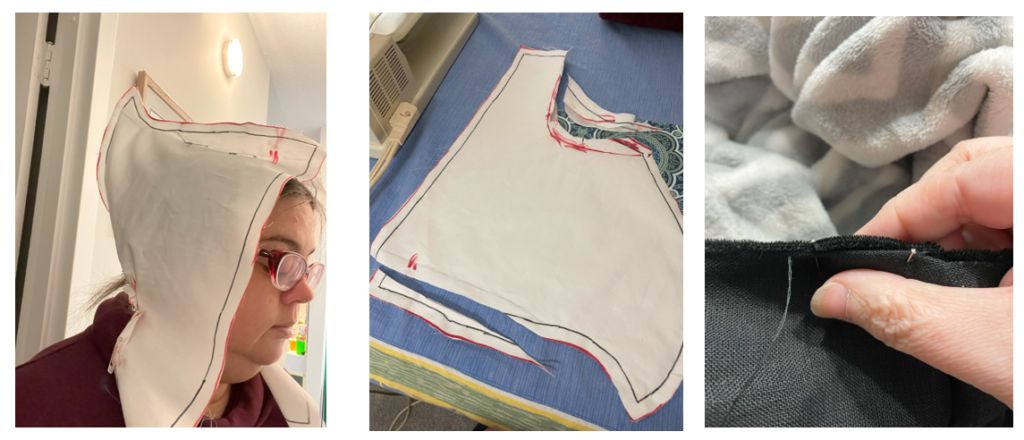
I started by scaling up the pointed bonnet pattern in The Queen’s Servants on gridded gift wrap paper. I then cut out a muslin, which was initially way too large for my head. I initially tried sewing up the hood along the red line in the third photo to see if that would improve the fit.

Quite a few adjustments later, I finally found a shape I was happy with. I cut off the excess width off my muslin and used the fitted muslin as my finished pattern. The next step was cutting out the black velvet and black linen lining. The back neck seam was machine stitched as I was running out of time to complete all my components. Then I pinned the lining and velvet, wrong sides toghter, and turned under the seams. Once the edges were pinned togethre, I whiped the two layers together using polyblend black thread. I have linen and silk thread, but not in the correct color.
The most difficult part of the pointed hood project was sewing in the millinery wire to stiffen the point of the bonnet. Brass or copper wire covered in ribbons would most likely have been used to stiffen the bonnet in the 15th century. In addition, wool might be stuffed into the point to help keep its shape. I sadly didn’t take a photo of the wire before I sewed it into the bonnet. The wire is bent at the tip of the hat and is shaped to match the angle of the hat. The ends run parallel until they reach the crown of the head and are rounded at the ends to avoid discomfort. A note on my fabric selection: this is the cheap synthetic blend of black velvet, as opposed to the nicer velvet I used on the round bonnet. The back of the velvet had a nice weight to it, and yielded better results.

Pointed Bonnet Lessons Learned:
- A good fit for the pointed bonnet is key to having the point stick up and hold its shape.
- It is important to draft the bonnet slightly deeper than your head so you have enough excess brim to turn back and let the lining show.
- When pinning the gable paste and pointed bonnet together, it is important to have the brim of the pointed hood turned back. If you skip this step, the paste will not be positioned far enough back to support the point of the bonnet.
Next time, I would love to make an embroidered pointed bonnet and an additional unembellished frontlet: possibly a textured or colorful silk.
Pointed Bonnet Accessory: A Tawny Silk Tippet
The accessory I wanted for my pointed bonnet was silk tippet, or what we might call a veil in modern times. According to The Queen’s Servants, tawny (gold) is a commonly used color in women’s headgear. I lucked out and sourced a few yards of silk organza for bargain basement prices at a fellow costumer’s online sale. I cut out a square of fabric, using the width of the fabric as my guide. I did a roll hem by hand.

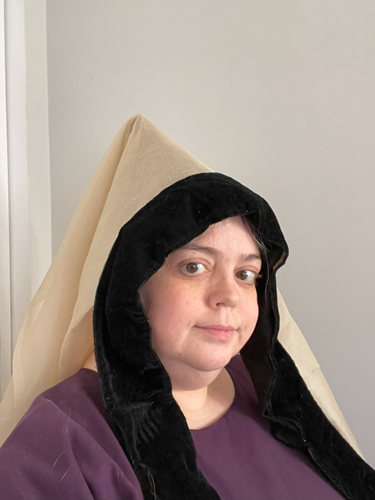
Project #3: Late 15th Century English Gabled Bonnet

Figure 19. Elizabeth of York, Unknown Artist. Circa late 16th century, based on a work circa 1500. Oil on Panel. National Portrait Gallery. London. U.K.
I chose to reproduce an early English gabled bonnet, similar to the one Elizabeth of York wears in Figure 1, because I have never seen one recreated. Today, we would refer to the style as a Gabled Hood. All the primary sources referred used the term ‘bonnet,’ so that is the term used in this paper. Early gabled bonnets extend well-beyond the chin and appear to have many options for styling the back.

I recreated the gabled bonnet with a homemade linen buckram paste, a black velvet bonnet that hangs down the back, and a black velvet frontlet lined in contrasting tawny silk taffeta. These three components make a complete gabled bonnet. However, I chose to risk the fine for violating sumptuary laws, and added an embellished gold silk frontlet and a decorative edge worthy of Tudor Royalty.
Anatomy of an Early Gabled Bonnet

Figure 20. Elizabeth of York (1466-1503), Queen Consort of Henry VII. Circa 16th century. Oil on panel. National Trust, Nostell Priory. West Yorkshire, England. Added notations about gabled bonnet components added by author.
I consulted the Privy Purse Expenses of Elizabeth of York and an article about the Dress in the Household Papers of Lady Margaret Beaufort. The words ‘bonnet’ and ‘frontlet’ appear consistently. The bonnets mentioned at court are almost exclusively black, generally made of velvet, occasionally satin. Sumptuary laws enacted under Edward IV stated that “the wives, and daughters unmarried, of persons having possessions of the yearly value of 10. and upward, were permitted to use and wear frontlettes of blak velvet, or of any other cloth of silk of the colour of blak.”[1] To the modern eye, black may seem like a somber color, but it was the height of luxury: quality black dye was extremely expensive.
While most frontlets were black, the author of The Queen’s Servants does mention that they could be lined in a contrasting color: generally crimson, tawny, or white. In addition to velvet and satin, sarcenet— a kind of thin silk taffeta that was used for linings— was also common. Queen Elizabeth’s Privy Purse, Henry VII Privy Purse, and the Privy Purse of Princess Mary all mention extravagant gold frontlet purchases which may be what the embellished frontlet overlay is in Queen Elizabeth of York’s portrait. One amusing entry showed that Princess Mary lost a gold frontlet in a wager to Lady Margaret, the King’s mother.

Figure 21. Katherine Yelverton, bronze effigy, circa 1510, St. Mary’s Church, Rougham, Norfolk.
Notably absent from the Privy Purse records were any references to ‘edges’ or ‘borders’ as they pertained to bonnets. However, the publication I consulted only had one year of her accounts. Caroline Johnson states that the Great Wardrobe mentions a 16 shilling “paste with an edge.”[2] 16 shillings is significantly more expensive than a regular paste, which only cost a few pence. I only managed to find one additional visual record of an edge: the 1510 effigy of Katherine Yelverton. Katherine’s effigy confirms that edges were not restricted to members of the royal family.
In the sections discussing silk for bonnets, both Lady Margaret and Elizabeth’s Privy Purse discuss purchasing black velvet to make a tippet. I believe the velvet back of the bonnet may actually be a black velvet tippet.
Gabled Bonnet Construction

Using the pattern shapes from The Queen’s Servants, I made a mock up with cardboard, tape, and twine. I originally drafted a very long bonnet similar to Elizabeth of York’s, but learned I have a short torso. I shortened the pattern to stop the bonnet above my bust line. At its original length, my bosom kept knocking it off my head.

I wanted to try making my own linen buckram after watching a YouTube video from Burnley & Trowbridge. My research suggested that Gum Arabic or animal glue would be a period glue option. A Google search suggested xanthan gum was a good modern substitute to Gum Arabic. I already had some on hand (key ingredient in making sugar free ice cream).

I added ½ tsp of xanthan gum powder to 8 tbsp hot water. I made another batch later in the project, and had better success by immediately mixing the solution after every tablespoon of water to avoid the clumpy bits. The glue sat for 20 minutes and allow the gum powder to fully congeal.

Once dry, the buckram was stiff like paper. Helpful tip: don’t iron the buckram after it dries. It lost some of its crispness, despite not using any steam. My thanks to my cat, Lord Dare, for the shameless photobomb.

Queen Elizabeth’s wardrobe book mentions purchasing pastes. The cost was minimal: a batch of seven for 4 pence, and “may have been made of buckram, linen, or canvas.”[3] To make my paste, I cut out the buckram pattern piece without any seam allowances. It is possible that with a coarse enough linen and multiple coats of glue, the linen base could form the paste without needing the additional support of wires.

Figure 22. Gabled “Diamond” Headdress Frame, copper alloy, circa Late 15th to early 16th century. Museum of London: Medieval London: Daily Life and the Thames: Fashion. London, U.K.
Because my linen was densely woven, the glue did not as easily saturate the buckram. It would not support the weight of the headdress, so I added millinery wire. The Museum of London has a metal frame from a gabled bonnet in its collection. It’s short, and most likely from Henry VIII’s era, but it shows that wire could plausibly been used on the linen pastes of earlier bonnets.
Covering the Paste

I sewed on a layer of a layer of cotton flannel to pad the frame. This hides the wires and provides a smooth surface for the fashion fabric. My local thrift store had an old flannel sheet that worked perfectly. A third and final layer of white linen completed the paste. Herbert Norris in Tudor Costume and Fashionsuggests that the Tudors would have left the wires plain or covered them with a ribbon.[4] The other possibility is that wool or wool fabric was used to pad areas with wires.
Making the Edge

I used one long strip of linen buckram, and created the angled shape of the bonnet by creating diagonal stitching. I thought this would be a quick step, but creating the perfect angle proved to be rather difficult. The three corners were each stitched and re-stitched multiple times before I was satisfied with the result.

The edge of the bonnet was made using the same techniques as the paste. I noticed the points of the wire supports in the paste were poking through all three layers. When adding wires to each of the edge angles, I made sure to round the edges with needle nose pliers and avoided the same issue.

Remembering how I struggled to use a single long strip of linen and form the angles with diagonal seams, I took a shortcut and cut two pieces by tracing the edge. Such wanton waste of fabric is not period: fabric was expensive, labor was cheap. The buckram yielded a crisp finish. I left the back of the edging uncovered, so I could bejewel my edge and cover the threads when finished.

The ‘jewels’were made of gold bugle beads, craft store jewelry beads, and buttons for financial reasons. I was also constrained on time and needed to rely on what I had in my craft and sewing stash. I chose to cut off the button shanks and use glue to attach the buttons so they would lay flat. I also used bugle beads to create squares around the ‘gems.’ While I would have preferred a method where I could have sewn on the ‘jewels,’ everything I found on Etsy was simply too expensive. I look forward to learning more about jewelry making so I can create better period substitutes.

Once the decorations were complete, I pinned the backing on to the edge and hand stitched it in place.

A curved millinery needled made quick work of attaching the edge to the paste.

Knowing that this area of the paste would be covered by the frontlet, I made no attempt hide the black stiches. I also purposefully used very large stitches: the edge can be easily removed if I ever want to wear a more plain version of the gabled bonnet. To take photos of the gabled bonnet without the edge, I was able to remove the stitches without damaging the edge or paste, in about 5 minutes.
Gabled Bonnet Accessory: A Velvet Tippet
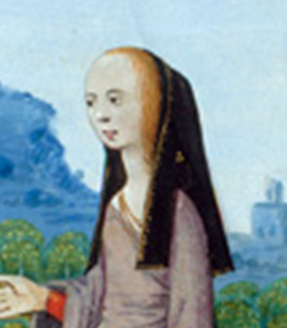
Figure 23. Detail of Lestrif de Fortune et Vertu, Miniature by Martin le France, dedicated to Philip the Good. Circa last quarter of the 15th century, Netherlands. Royal 16 F IV f.3. British Library Catalogue of Illuminated Manuscripts. London, U.K.
Herbert Norris and Sarah Thursfield, author of The Medieval Tailor’s Assistant, argue that that the gabled bonnet is constructed from one piece of fabric, slit in order to create a front and back, similar to this French Hood in an illumination from the late 15th century.

While some bonnets may have been constructed in one piece, the fact that Tudor Wardrobe accounts repeated mention the bonnet and frontlet as separate components leads me to believe they were two separate pieces. I couldn’t find any images of early gabled bonnets from the back, but Elizabeth of York’s portrait seems to show her bonnet neately folded inward, and flowing straight down the back. I decided to try a semi-circular shape based off of Herbert Norris[5] and Sarah Thursfield’s[6] books.
I draped a measuring tape over my bonnet while wearing it to figure out roughly how long the veil should be. I then cut a rectangle of velvet the length of my measurement (roughly 27 inches). I folded the piece in half with the nap to the middle, pinned a 27 inch piece of twine to the corner, and then moved it in an arc and traced the line with tailor’s chalk. The result was an almost perfect semicircle. I sandwiched the velvet with polyester taffeta, folded in the seams, and then hand stitched them together. I would have loved to use silk, but I only had the poly on hand. Once I pinned it to the paste, I was amazed that I didn’t need to arrange the bonnet: It naturally folds inward due to the shape of the paste.
Gabled Bonnet Accessory: Frontlet

I cut out a strip of velvet slightly larger than the visible portion of the paste. I used a tawny silk taffeta from my fabric stash for the lining. I made it using the same sewing technique as the bonnet.
Gabled Bonnet Accessory: Gold Frontlet

I’m not quite sure what possessed me to attempt the decorative gold frontlet in Elizabeth of York’s portrait. I have no experience embroidering or goldwork, and did not have time to research late Gothic/early Tudor techniques. I grabbed a piece of silk and just dove right in. As a result, there a definitely things I would do differently next time.

I used pencil to trace off the embroidery pattern. I couched on gold DMC floss. I don’t have the proper words for describing my dislike of polyester gold floss. After several days of broken, knotted, shedding threads, the gold outline was complete. I then used a chain stitch to fill in and outline the design.

If the edge took days, the gold frontlet took about a week to complete. I glued on more buttons and then sewed on pearls. In an ideal world, I would have made one more pass with the pearls, but time was short and I was happy with the result.
Sewing the backing onto the embellished frontlet covered up all manner of newbie embroidery sins. I did not have a thread that matched the color of my silk, so I used some white silk thread I found in one of my sewing drawers. If I were to do it over again, I would have backed the gold frontlet in white linen.
Styling the Hair
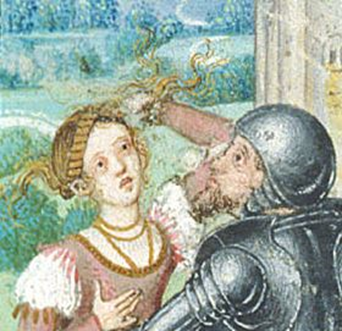
Figure 24. Troy, by John Lydgate, circa 1457-1460**, Detail of a miniature of Troilus taking leave of Cressida, with Trojans at the gate behind. English origin. Royal 18 D II. Catalogue of Illuminated Manuscripts, British Library, London, U.K.

The detail of a 16th century manuscript shows the hairstyle worn beneath a gabled bonnet. The hair was generally worn in a crown of braids at the front of the head, wrapped with a ribbon. The Tudor Tailor book is an excellent resource for learning how to create this style.
Gabled Bonnet Lessons Learned:
- A stiffer buckram would help in creating the paste, possibly making the millinery wire step unnecessary. Also, I need to use linen buckram to finish the paste.
- Despite using a tape measure to estimate the length of my frontlet, the black velvet frontlet was shorter than I would have liked. I would add an extra 4-5 inches so the frontlet would drape more gracefully.
- There were many learning opportunities while making the gold frontlet. I’m looking forward to studying period embroidery techniques. Next time, I will stretch the fabric on a frame before embroidering. I’d also like to learn some jewelry techniques to improve the look of the gold frontlet and edge.
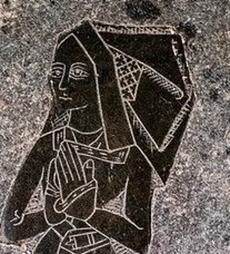
Figure 25. St. Mary in the Marsh, Kent, Margaret Bellingham wife of Roger Bellingham 1480s
Next time: I’d like to make a butterfly henin and see if I can achieve the crazy gabled henin look on the brass effigy.
Bibliography
Bradfield, Nancy, and Nancy Bradfield. “Henry VII (1485-1509); Women’s Fashions.” Essay. In Historical Costumes of England 1066-1968, 69–73. Costume & Fashion Press, 1997.
Dreher, Denise. From the Neck up: An Illustrated Guide to Hatmaking. Madhatter Press, 1981.
“English, French, and Burgundian Women’s Bonnets in the 15th Century.” GBACG Finery, February 3, 2021. https://gbacg.org/finery/2014/english-french-and-burgundian-womens-bonnets-in-the-15th-century/.
Johnson, Caroline, and Jane Malcolm-Davies. The Queen’s Servants: Gentlewomen’s Dress at the Accession of Henry VIII; a Tudor Tailor Case Study. Fat Goose Pr., 2011.
Kammel, Frank Matthias, Johannes Pietsch, and Thessy Schoenholzer Nichols. “It Does Not Need To Be Hard To Hold.” Essay. In Structuring Fashion: Foundation Garments through History, 29–37. Hirmer Publishers, 2020.
Lynn, Eleri. Tudor Fashion Dress at Court 1485-1603. Yale University Press, 2017.
Mikhaila, Ninya, and Jane Malcolm-Davies. The Tudor Tailor: Reconstructing 16th-Century Dress. Costume and Fashion Press, 2008.
Netherton, Robin, Gale R. Owen-Crocker, and Susan Powell. “‘Textiles and Dress in the Household Papers of Lady Margaret Beaufort (1443-1509), Mother of King Henry VII.”.” Essay. In Medieval Clothing and Textiles 11, 139–58. Boydell & Brewer, 2015.
Norris, Herbert, and Richard Martin. “The Reign of Henry VII: Headdresses.” Essay. In Tudor Costume and Fashion, 97–112. Dover Publications, Inc., 1997.
“Privy Purse Expenses of Elizabeth of York: Wardrobe Accounts of Edward the Fourth. with a Memoir of Elizabeth of York, and Notes: Nicolas, Nicholas Harris, Sir, 1799-1848: Free Download, Borrow, and Streaming.” Internet Archive. London: W. Pickering, January 1, 1970. https://archive.org/details/privypurseexpens00nicouoft.
Thursfield, Sarah. “Women’s Cloth Head-Dresses and Hoods.” Essay. In The Medieval Tailor’s Assistant: Making Common Garments, 1200-1500, 200–204. Costume & Fashion Press, 2001.
Trowbridge, Angela. “Historic Fashion Tutorial Series: Making Buckram.” YouTube. YouTube, September 19, 2016. https://www.youtube.com/watch?v=xbdSvjZn5kU.
“Tudor Gabled Hoods: A Closer Look.” YouTube. YouTube, January 26, 2021. https://www.youtube.com/watch?v=ppBXVvp1AkQ.
Weir, Alison. Elizabeth of York: A Tudor Queen and Her World. Ballantine Books, 2013.
Thank you for reading all the way to the end! As a reward for getting this far, here is a cat, in a hat.
[1] Ibid, page 192.
[2] Caroline Johnson and Jane Malcolm-Davies, The Queen’s Servants: Gentlewomen’s Dress at the Accession of Henry VIII; a Tudor Tailor Case Study (Fat Goose Pr., 2011). Page 21.
[3]Ibid.
[4] Herbert Norris, “Henry VIII, Section IV Hairdressing,” in Tudor Costume and Fashion (Mineola, NY: Dover Publications, 1997), p. 336.
[5] Herbert Norris and Richard Martin, “The Reign of Henry VII: Headdresses,” in Tudor Costume and Fashion (Dover Publications, Inc., 1997), p 105.
[6] Sarah Thursfield, “Women’s Cloth Head-Dresses and Hoods,” in The Medieval Tailor’s Assistant: Making Common Garments, 1200-1500 (Costume & Fashion Press, 2001), p. 204.