
by Mistress Jorunn nic Lochlainn
Introduction
Many crafts were undertaken to create all the elements that make one pair of leather gloves of the 16th and 17th century Elizabethan court. Whether in the 16th and 17th century or today, glover, embroiderer, bobbin lace maker, lampworker, and metal worker (spangles), are the included crafts. To create this pair of gloves, I learned each of these crafts. Each art form used to compose the glove is documented in this portfolio. The attached paper identifies the historic basis for each craft and the contribution to the Elizabethan glove. My actions and resources used to make the glove are defined and explained. All to create the pair of Elizabethan gloves on display that emulate those surviving editions housed in museums all over the world.
Glover – The gloves are made of leather, easily bought these days, but it is important to understand ‘glove’ leather vs. standard leather to acquire the proper fit in the final product. Understanding the tanning process to acquire the soft, supple leather used for gloves is part of being a glover who was the ‘tanyer’, the person who tanned the hides, in earlier time periods. The ‘glover’ specific craft arose from the tanyer’s efforts (Beck, 135). The glover skills during Elizabethan times did not tan the hides but understood the tanning process. The 15th and 16th century glovers evolved from the tanyer and were specialized.
The pattern used to make the glove on display was designed by me after examination of an extant Elizabethan glove in the V&A museum in London in 1991. Pictures taken at that time are included in my documentation below. The glove pattern is critical to provide the pieces of leather that when sewn together will deliver a glove that fits the hand and is comfortable to wear. The extended length of the fingers on an Elizabethan glove is a noticeable feature of the glove that makes it unique to the Elizabethan time. Tools and materials used in the period and by me to make these gloves are also explained in the ‘Gloves’ section.
Embroidery –Embroiderers worked on the cuff section and provided it to the glover. The embroidery design used on the gloves is my own, but the cornflower (blue flower on cuff of gloves) was used on extant versions in the V&A Museum. The materials, stitches and other techniques I used and why are identified in the Embroidery section under ‘Cuff’.
Spangles – ‘Small thin pieces of shiny metal, typically sewn as one of many clothing for decoration’ (Merriam-Webster Dictionary). Spangles are used in this embroidery and woven into the bobbin lace. I will explain how and why I hand made my own spangles for the embroidery, but not for the lace.
Lampwork – Venetian glass was very popular in the Elizabethan court and glass beads used in many articles of clothing as I argue in this section. I made the little blue glass beads that litter the design in the embroidery of this glove. I’ll share my lampwork techniques, the same used by Venetian lampworkers of the 16th century, for creating the little beads and how I got them from fire to cuff. I learned lampwork so I could make the beads that also weigh the hand carved wooden bobbins used to make the bobbin lace.
Ruching – ‘Ribbon ruffles’ (North-Tiramani, 150) was another term used during this time period for this feature. This is the gathered ribbon trimmed with bobbin lace that wraps around the wrist section of the glove. This documentation illustrates the use of ruching on extant versions. I will detail the ruching of the ribbon I used to get the same effect on the gloves in this display. I show how the ribbon was gathered to present the ruched effect and how it was sewn to the glove using period techniques.
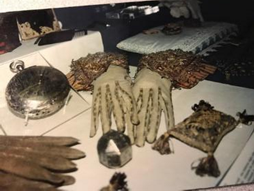
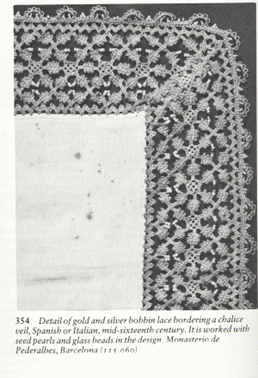
Bobbin Lace – Many extant gloves in museums have variations of bobbin lace sewn on the edge of cuffs to embellish. Pictures I took from the Victoria and Albert Museum (V&A museum) of gloves that have this lace are displayed in the documentation below. I demonstrated how I made the tools (bobbin lace pillow and hand carved my own bobbins) and included the spangles to make the bobbin lace a part of the gloves. There are two sets of bobbin lace; one set along the edge of the ruched ribbon, the other on the edge of the cuffs. I’ll explain both.
Fine hand stitching – Then, in the finale, I will describe how I combine these treasures together to create the pair of Elizabethan gloves on display.
(Queue drum music – Original Conan the Barbarian theme song)
Let me sing you a song of skill!
- ELIZABETHAN GLOVES
- Leather
A glove created for the court of Queen Elizabeth I and worn by both men and women, would be created from the skin of lamb or doe. It would be tanned/prepared using a special method of tanning that included puering using dog manure and egg yolks that rendered the hide soft and supple (Ellis, 39). Soft and supple are qualities required for a good glove leather to cover the hand for comfort and flexibility. The English ‘tanyer’ was also the early glove maker (Beck, 135). By the 16th century the glove maker understood the qualities of good leather used for gloves without doing the tanning themselves. This knowledge allowed them the ability to purchase the best hides. There is a long and tedious process for properly preparing leather for a glove[1]. The most fashionable gloves in Elizabeth I time were either in the buff (not colored) or ‘in the white’, directly from the tawed process and dried in the sun bleaching the hides white (N.L.Leyland and J.E.Troughton,24).
To protect the English Glovers and their craft, King Edward IV in 1463, established a prohibition of the importation of gloves which lasted until 1825. This afforded the English glover an insured market for the development of their craft and product in England. Gloves made in Elizabeth’s court would be made from English leather from Worcester, England, the area in England established for tanning leathers. Gloves other than gifts, and were created in England for the Queen, were made by her personal glover, John Wynyard according to the inventory accounting in Elizabeth’s Wardrobe Unlock’d (217). Spain and France produced some fine gloves that found their way into England as gifts despite this prohibition (Leyland/Troughton, 8). It was a common belief at the time that to have the perfect glove “Spain should have tanned the skins, France have cut the pieces, and England have done the sewing” (Ellis,31).
I do not have the resources to prepare a hide from the animal to a final prepared piece of leather, so I had to purchase it. The hide is not prepared as they were in Elizabeth’s time, but even though modern chemicals and tanning methods were used for my leather, it has the same coloration (white), flexibility, and suppleness as described in the medieval leather process identified in my research above, and therefore, I used this leather to construct my gloves. I used a 1 oz. doeskin, with the same suppleness as an English tanned lambskin, and an important quality for glove leather. The suppleness, or stretchability, of the leather allows the flexibility needed for the hand to move inside comfortably. As a glover, it is important to understand the difference between regular leather and a ‘glove’ leather. It is from the knowledge of the medieval tanning process and how glove leather was created that allowed me to choose the proper leather for my gloves.
- Glove Pattern
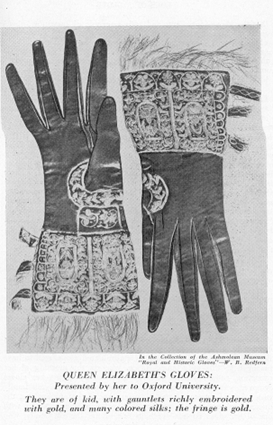
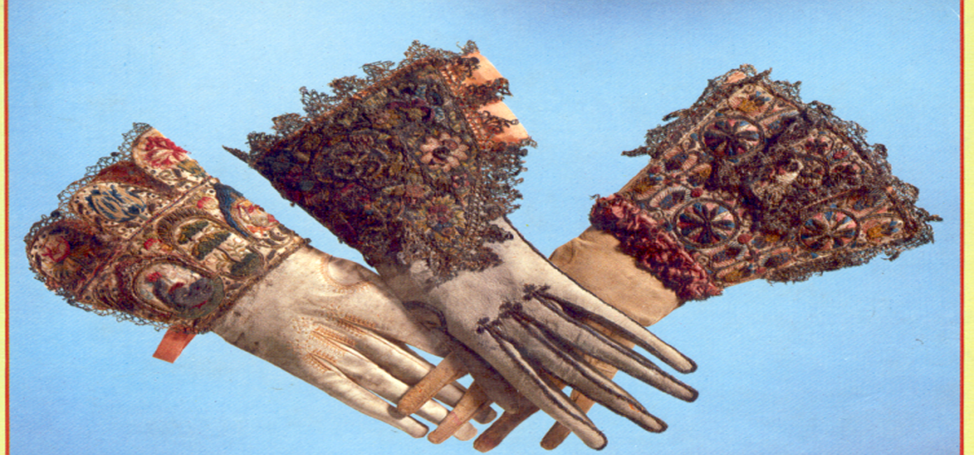
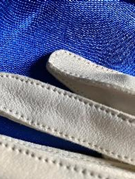
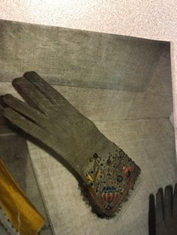
The most significant feature of most true Elizabethan gloves is the extra-long length of the finger stalls. It was said that Queen Elizabeth had long, elegant fingers thus her gloves would also have this feature (Cummings, 24). A pair of Elizabeth’s gloves now in the possession of the Ashmolean Museum, England, have a middle finger and thumb that measure 12 cm long (almost 5 inches long). The same gloves only measure 8.5 cm (3.34 Inches) across the knuckles (Beck, 43). The custom of the time was to emulate royalty, so many wore their gloves with long finger stalls in keeping with the fashion of the Queen (see picture). The forchette, the piece that is sewn between each of the fingers on the inside of each stall, only went to the top of the finger stall and not over the top. The tip was sewn together. See V&A picture on page 11 for illustration.
The Worshipful Company of Glovers was established in 1349 in England (and still functions today) and monitors the standards of gloving. All things to do with making a pair of gloves are documented and directed by this company in England. It was granted a Royal Charter in 1638 by King Charles I. Many other organized glover guilds are documented throughout Europe (France, Austria, Germany, Spain and Ireland) from 1190 onward (Ciba, 2212). Diderot’s Encyclopedie, published in 1764, records the patterns, tools and methods the early glover of the 16th/17th century used (Cummings, 13). The process of making gloves for royalty during the Elizabethan times was very problematical and usually resulted in adjustments afterwards (Collins, 52). Gloves are also recorded as being made on the large and loose side (Ellis, 18). On a surviving pair of leather gloves from the Victoria and Albert Museum in London England, there is what looks like an adjusting seam on the forchette of the index finger. From these sources we can determine that there was no standard pattern for gloves and that adjustments were made after the glove was finished.
I have not yet found a record of reference to a standard sizing process during or prior to Elizabethan times. There is reference in C. Cody Collins, Love of a Glove to Planche’s Cyclopedia of Costume concerning young Normans, “They covered their hands with gloves too long and wide for doing anything needfyl.” (Collins, 6). These recordings lead us to believe there is evidence that the gloves weren’t fitted to the individual’s hands. I on the other hand (no pun intended) feel that it is in my best interest to make a glove as close to the person’s hand size as possible for the modern comfort we are accustomed to.
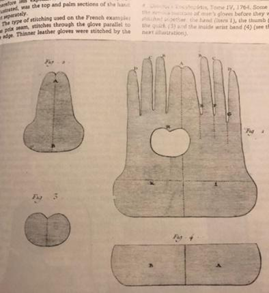
According to Cummings, the pattern consisted of 5 pieces plus 3 more if you use the optional quirks. The quirks mentioned are optional because they are not found on all extant Elizabethan gloves in the museums. The hand (trank), one piece that included the top and palm side of the hand folding along the inside of the hand allowing a hole for the thumb; the forchettes or forks, the piece that gets sewn between each set of three fingers; and the thumb. The skill in assessing the fit of the glove varied from maker to maker, guild to guild (Smith, 68). Elizabeth’s Wardrobe Unlock’d lists the tools a tailor used to work and it’s safe to say the same tools were used for making a pair of gloves. This includes a tailor’s chalk or soap to mark the pattern when it’s laid out on the leather, a very sharp pair of shears, irons, pins, needles, weights, a doling slab and a staking beam (Arnold, 181). The glove patterns were cut from pieces of parchment.
The pattern I used to make the leather pieces that are sewn together to create my glove is one I devised based upon a hands-on examination of Elizabethan gloves in the Victoria and Albert (V&A) museum in London, England in 1991, and therefore is original. I edited the pattern as needed to fit many, many, people over the past 40 years resulting in the pattern I use today as a basis for all my gloves. It is very similar to the patterns recorded in the book Gloves, by Valerie Cummings. The template of my glove pattern is cut out from a piece of heavy paper.
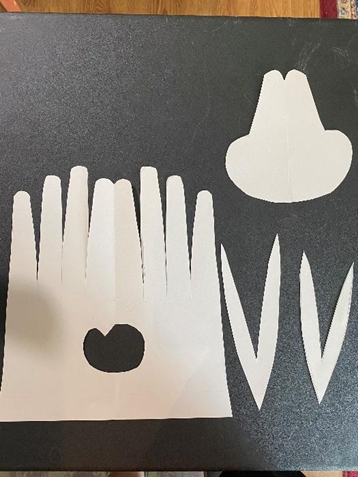
To get my glove pieces from my pattern, I laid my leather on a flat surface with the head and tail of the hide identified. When an animal is skinned it is usually cut from the neck to the groin on the underbelly portion of the skin. When you lay your hide out, the middle portion will be the part that covered the back of the animal. This is considered the backbone of the hide and runs from head to tail. It is the thickest portion of the hide. The part on the outside edges of the hide would have been the underbelly skin and is the thinnest part. The hide should have a slight stretch when pulled from side to side.
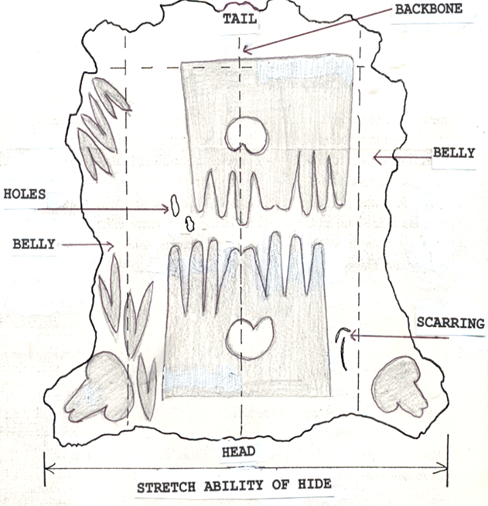
I took advantage of the stretch ability of the hide. I want to accommodate the expansion of the hand when you make a fist so I will place the pattern, so the knuckle portion of the pattern accommodates this flexibility. How to lay out a proper glove pattern: lay your trank so the fingers are pointing to either the head or the tail as illustrated in the diagram. Avoid any holes or scaring. The forchettes and thumb pattern pieces can be placed (as close together as possible to conserve leather) in the belly portion of the hide. As we stated earlier, the hide is thinnest in this portion making these pieces more flexible. Flexibility is important for these pieces because these pieces are in the part of the hand that endure the most stress when used.
I cut out the pieces of the pattern from the leather, using special leather cutting scissors (leaving a nice even edge that is easily sewn). I grouped the pieces by glove (left, right), then prepared for the next step: sewing the pieces together.
- Needles and Thread
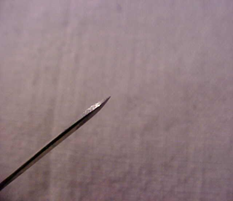
Needle – To make stitches in the leather to sew the pieces of glove together, you need a needle and a thread. The Romans introduced needle making into Britain and the skill was learned and carried on centuries after. In the 16th century the finer needles were made by German and Italian craftsmen and were imported into England by the Hanseatic League until the Importation Act stopped the trade. Elias Knause and Christopher Kings were German needle makers in England. Kings lived in Whitechapel and Knause on the London Bridge. They established themselves in London during the middle of the 16th century (Rollins, 6) and provided the special needles for glovers; the triangular-pointed needles. They provided needles for the many crafts; seamstress, tailor, tapestry worker, sailmaker, tentmaker and of course glover/tanyer. The process of making iron needles is a very long and special process.
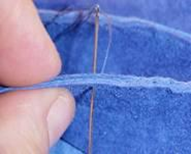
A glover’s needle, which has a three-sided head, slips through leather like a hot knife through butter. These needles are great for medium and heavy weight leathers like buck, elk, and some doe. You can also use simple ‘sharps’ to sew the finer leather. I use a ‘sharp’ needle, size 9 on the finer doe and kidskin. The key is to be able to stab and draw the waxed thread easily through the leather. Whichever needle serves this purpose is the one I use. I recommend testing on a scrap piece of leather prior to using it on the final product. I strive for stitches evenly lined along the seam as is illustrated on the extant surviving pieces. I used a size 5 glovers’ needle on this pair of gloves. It was small enough to effectively pull the waxed, silk thread through the leather without damaging the leather. It is important to use a metal thimble to protect your fingers as you draw it back and forth.
Thread – Silk woman, silkman or Millner were the resource for silk or linen threads, and miscellaneous items like buttons, wax, and ribbon. Linen and silk were the common threads used for sewing many things, including leather gloves. Silk is derived from the cocoon of the silkworm. A ‘throwster’ is a silk woman who converts the raw silk imported from Italy into threads for use with sewing and embroidery. The silk woman traded in her own right, a privilege accorded to the women of London (Arnold,219). The thread when used for sewing, was commonly covered with beeswax prior to use to increase the strength of the thread. The wax also facilitates a strong hold in the leather (Emlyn-Jones, 49).
To sew the glove pieces together, I used waxed, 100% white silk thread. To apply the wax, I pulled the thread over a block of beeswax. The wax gives the silk holding power in the leather, keeping the stitches tight as you add a new stitch. It also strengthens the hold and preserves the fibers.
- Stitches and Seams
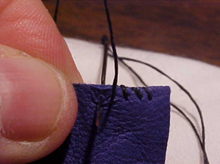
Stitch – The two stitches used on Elizabethan gloves that hold the pieces of the glove together is a ‘prix’ stitch or a ‘round’ stitch. The prix stitch is the most favored for endurance and strength (Ellis, 81). It is made by placing the opposing pattern pieces together with the flesh side (fuzzy underside) pressed together. Pull the needle back and forth at an even consistent distance, through the leather, parallel to the edge. The round stitch is created by holding the pattern pieces together then pushing the needle through the leather, looping the thread around the edge at an even consistent distance, then pushing the needle back through on the same side as the first stitch, just like a whip stitch (Leyland/Troughton, 31). Some of the gloves from the pictures of the gloves in the V&A, are made with a prix stitch. If you look carefully, you can see tiny holes at the edge of the finger, but a thread does not go around the seam, indicating that the thread is running parallel to the seam through the leather. The average number of stitches per inch was 22, whether it was prix or round (North-Tiramani, pg. 151, illus.15.1).
I used the prix stitch to sew these gloves together. It is my preferred stitch based upon my experience of 40 years and hundreds of gloves. My experience indicates it is better served on the heavier leathers like 3-4 oz elk for gloves like falconry or under fighting gauntlets, but if done correctly can look very nice on finer leathers, like 1 or 2 oz leathers. There is no hard, fast rule. The important factor is the ability to apply an even, consistent, stitch.
Seam – As with many extant surviving gloves in the V&A museum, the seam can be on the inside or the outside. The pictures of gloves are pictures I took on my visit to the V&A museum in London in 1991. It appears seam placement was at the discretion of the maker of the glove.
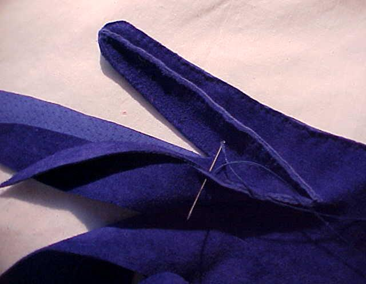
I sewed these Elizabethan gloves with the seam on the outside. I like the seam on the outside of the glove because it allows for a more comfortable fit without the feel of the seams against the fingers on the inside. It also allows for display of the stitches which can be aesthetically pleasing. The order in which I sewed each piece:
Step 1. Sew the seam on the outside of the hand from the top of the pinky finger down to the cuff.
Step 2. Tack in the forchettes between all fingers.
Step 3. Sew in the forchette between the pinky and the ring fingers.
Step 4. Sew in the forchette between the ring and index fingers.
Step 5. Sew in the forchette between the index and pointer finger.
Step 6. Tack in the Thumb piece (see the following instructions.
Step 7. Sew in the Thumb
Step 8. Attach the cuff (if done separately)
I did not follow the instructions in Women’s Dress Patterns by North and Tiramani, for sewing the pieces together. This book is a relatively recent publication, and I have been doing gloves for 40 years, so I created my own process many years ago based upon the information I acquired then. The practice is tried and true. The result is the same. Just know there are alternative methods.
- CUFF
- Embroidery
Silk threads in many colors decorated the garments and accessories of the 16th and 17th century. Floral designs were popular due to the insurgence of garden cultivation in the private home. Tudor pacification facilitated gardens as an important part of the home. Botany also became a special interest of the learned world (Rigby, 36). Books like Culpeper’s Complete Herbal by Nicholas Culpeper were being written. It stands to reason that as the populace became enamored with the plants and flowers in these botanical editions, they would incorporate them into the other aspects of common living, like embroidery. A floral pattern was very popular and ‘cosmopolitan’, originating in workshops of Paris or Antwerp on the mainland and overflowing into England. The costly part of the gloves was the embroidery (Digby, 79). The Catalogue of English Domestic Embroidery of the 16th and 17th century has a list and pictures of recorded gloves that show that white satin or ‘sateen’ (Arnold, 371) was often used as the ground for a floral embroidery design on a glove cuff. This inventory also defines the stitches used in embroidery designs made in Elizabethan time (Nevinson, 94-97).
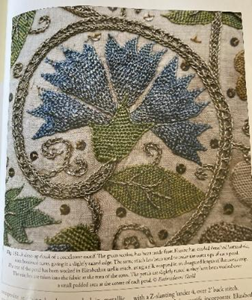
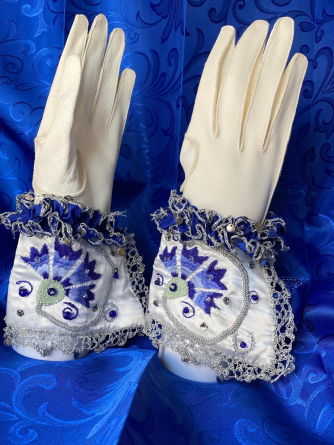
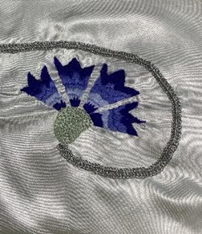
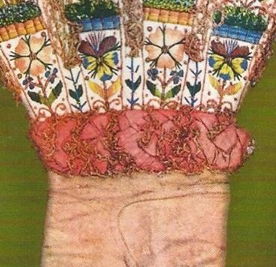
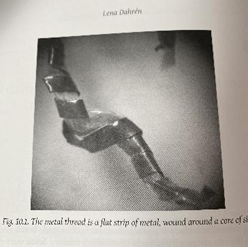
I chose a cornflower for my floral design because it has spiky edges that look cool. It was one of the floral designs commonly used in Elizabethan embroidery (see top picture). This was from a 17th century embroidered panel. I also liked the flower because it is blue, a heraldic color that represents my Kingdom of Atlantia. I used 100% silk floss on white satin. I backed the satin ground cloth with an embroidery stabilizer prior to applying the floss. The stabilizer helps with application of the stitches, so they are firm without bunching the material. The stitches for the petals of the cornflower are a ‘stem’ stitch, a stitch commonly used as an outline or filling stitch during this time (Staniland, 34). The green base bulb is done in a silk green chain stitch, which is a progression of loop stitches (Staniland, 35). The plaited stitch is done in the design using a modern silver cording but was done with a silver passing/filѐ thread (a core thread, usually of white silk, tightly wrapped with a thin flat strip of metal s-twisted making the inner core barely visible) during Elizabethan time. This stitch is found on numerous garments and furnishings in the Elizabethan time (Carey). Plaited stitches are a stitch applied in a woven fashion to give the raised effect on the cloth. All these stitches were mentioned as used on items in Elizabeth’s wardrobe inventory. I sewed silver spangles, blue lampwork beads, crystal and metal beads in the design to enhance the depth
- Spangles
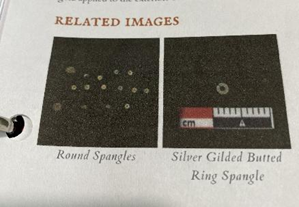
Spangles, also called Oes or Owes, are a small, usually round, piece of metal, much like today’s sequins (en.wikipedia.org/Wikipedia.org/wiki/Oes). They were used in embroidery, bobbin lace and other textiles to draw attention to the decorated item (historicjamestowne.org/collections/artifacts/spangles).
They were made from many types of metals including silver and tin. Robert Sharp obtained a patent to make gold oes in 1575 (Arnold, 369). The technique to make a spangle was by wrapping wire around a dowel or by punching flat rings out of a sheet of metal after it had been hammered flat from a strand of wire. A New Year Day’s gift in January 1600, Dorothy Speckard and her husband gave Queen Elizabeth a head veil of striped network, flourished with carnation silk and embroidered with oes” (en.wikipedia.org/Wikipedia.org/wiki/Oes). They are also found scattered among the embroidery design on a pair of gloves thought to be Henry the VIII (Redfern, cover).
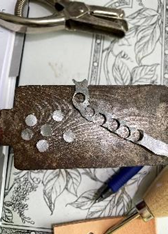
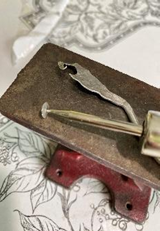
The silver spangles I sewed on the design of the Elizabethan glove on display were hand cut from a hammered piece of silver tin wire. Tin is identified as a metal used to make metal mounts, buckles and other small items found from excavations in the City of London undertaken by the Department of Urban Archaeology, Museum of London (Egan/Pritchard, vii). Based upon this, I used a tin wire to bang out flat, then I used a paper punch to punch the spangles out of the flattened wire. Each one is cut separately, and the center hole is punched with an awl. I made these spangles for the embroidery design only. They are different from the spangles in the bobbin lace (see bobbin lace). I sewed each spangle into the embroidery design with three silk threads as was done on the Layton Jacket from 1610 (Carey, 93).
2. Lampwork Beads
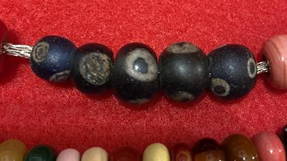
Glass beads have been a part of our world since the 2nd millennium. They were used to enhance fiber pieces in the 16th century (see picture of glass beads in lace). I added the little blue beads to enhance the embroidery design and so something I made was part of the design. “We know best small cylindrical fayence and glass beads in the colors white, (carneliean) red, (turquoise) green, and (lapis) blue” (Jargstorf, 6). Mummies were enclosed in nets of blue bugle beads. This craft continued through history. Many excavations find Roman beads in great abundance and is attributed to African trade in the 1st century. I had the opportunity to buy five Roman made blue beads at an antique bead auction in Denver many years ago (see picture). I wear these on strands between my Viking brooches. Blue beads are some of the oldest colored beads used for ornamentation.
“Glass is made from sand (silica), soda and lime, potash, lead oxide, and cullet (left over glass). Metal oxides are used to impart color: cobalt oxide turns a melt deep blue; iron or chromium oxide turns it green; gold changes it to cranberry” (Hoyt, 8). Venice Italy became the glassmaking center of all Europe during the 14th Century. In 1500 Venetian glass workers created ’cristolo’, a glass as clear as crystal (Hoyt,7). Venice continued to produce glass items and as a matter of fact is still known for its glass products today throughout the world.
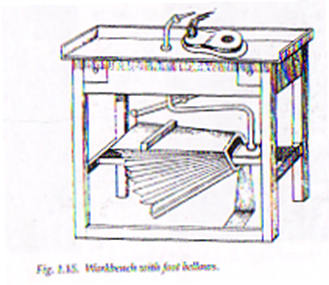
Soft glass is what was used in the 15th century. Glass rods were bought by the bead maker during that time (Jargstorf, 32). The glass of the 15th century was softer which means it had more silica vs. lime (Hoyt, 11). Lampworkers from the 16th century worked over an oil lamp and used a bellows system to infuse oxygen into the flame making it hot enough to melt the glass (see picture).
I learned this lampwork craft so I could make the beads that I sewed on the glove and use to weigh down the bobbins for the making of bobbin lace. Instead of the tallow oil lamp, I used a minor bench burner torch fueled by propane and oxygen to melt my ‘soft’ glass to create my beads. It is a modern, safer way to melt the glass. I bought the glass rods and melted them in the fire, rolling the molten glass on a metal rod coated with a clay mixture called bead release. Bead release allows the bead to be removed from the rod afterwards when the bead is annealed (annealing process is when you allow it to cool slowly to remove internal stresses and make it easier to work). My beads were annealed in a modern annealing oven vs a clay oven that was used in the 16th century. After they were made, they were placed inside the oven at a temperature of 960 degrees for 20 minutes then the oven was turned off and allowed to cool overnight. The next day each bead was removed from the mandrel (metal rod) it was made on, and the hole was cleaned using a special file made for the purpose. The beads were washed to remove any residual bead release then they were sewn into the embroidery pattern.
- Ruched Ribbon
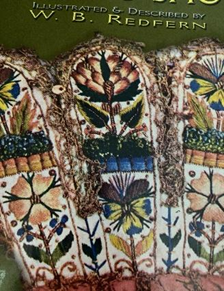
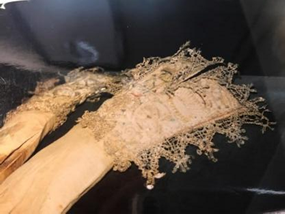
The ruched ribbon or ‘ribbon ruffle’ (Tiramani and North) is fashioned after a piece found on a pair of Henry VIII gloves in the picture to the right from W.B Redfern Royal & Historic Gloves and Shoes publication. It is made from a tabby woven pink silk ribbon just under 5/8” wide. The ruched ribbon on the Redfern glove measures 42” long. To create the ruffle effect, a row of running stitches was made 1/16” from the lower edge of the ribbon in white silk thread. The running stitches were gathered up to approximately 8 1/2” and then the ruffle was manipulated into a figure eight shape. A second row of stitching attaches the ruched ribbon to the body of the glove. The two ends are whipped stitched together for a continuous piece of ruched ribbon. As you can see in the illustration there is bobbin lace with spangles interspersed along the strand sewn on the edge of the silk ribbon (Tiramani, 152).
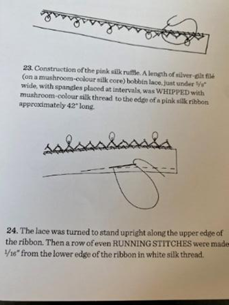

The ribbon I used for this glove was tabby weave blue ribbon 1 1/2” wide and was 43” long. Tiramani and North book Womens Dress Patterns explain how ruching is accomplished. I did not make the ribbon for I do not have the means to do so but bought the blue ribbon I used as they would have from the silk woman mentioned in earlier portions of this documentation. Using a whip stitch, I sewed my handmade bobbin lace (see Bobbin Lace section for info on how I made the bobbin lace for this portion of the glove) around the edge of the ribbon prior to gathering the ribbon to give it a ruching effect. I followed the procedures as they are described above and achieved the same ruching effect for my ribbon as seen in the picture. I first sewed the ruched ribbon along the edge of the cuff using a running stitch. I then folded the ribbon which was standing up, in half and sewed the ribbon on top of the section that was already sewn to the cuff. This allowed the ribbon to sit closer to the glove and an effect I preferred.
- Bobbin Lace
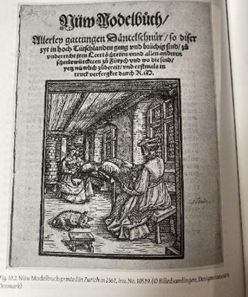
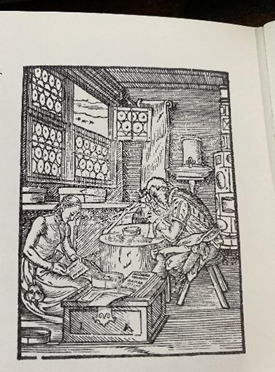
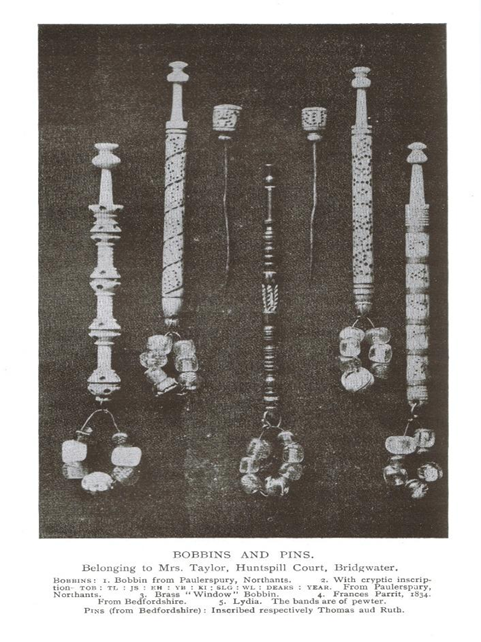
Bobbin lace, also known as bone lace and pillow lace, is found on many surviving garments from the 16th century located in museums throughout Europe. Some lace was known as bone lace because the earlier process consisted of using chicken or fish bones as pins and many times bobbins too. Bone lace was also believed to be made with a finer thread than bobbin lace (Wright, 8). Pillow lace is also a term used for bobbin lace because it was made on a pillow or bolster as shown in the wood engraving in the picture.
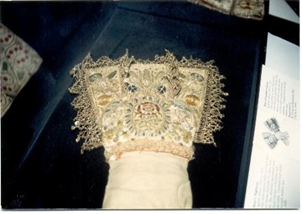
The pictures of the 16th century glove cuffs were taken by me in the V&A museum in 1991. It shows bobbin lace with spangles along the edge of the cuff and in the ruched ribbon around the wrist portion of the glove. Many 15th and 16th century extant editions of leather gloves have the same.
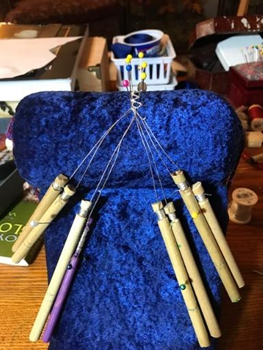
Bobbin lace is woven in many different patterns making up the delicious variety of lace seen attached to all the surviving pieces from the 16th century. The first known bobbin lace pattern book was published in 1591 (527, Palliser). The pattern for lace was created by poking holes in a specific design and order into a piece of vellum. This was called a pricking. It was by following this pattern, twisting and turning threaded bobbins, that the design in the lace was created. There are many different types of lace but bobbin lace can only be made on a ‘pillow’ with ‘pins’, a ‘pricking’ and ‘bobbins’.
The most common characteristics of the bobbin-lace pillow are that it is round or oval, stuffed very tightly with some material that will withstand the onslaught of many poking’s with a sharp pin (while still holding them firm) and covered with a cloth that will also allow a pin to penetrate while it prevents the stuffing material from coming through. Descriptions of early pillows say they were stuffed with hay, sawdust and sand; the sand serving the double purpose of sharpening the pins much like a pin cushion of today (Palliser, 391). Others stuffed the pillow with felt, wool or cotton.
A fully dressed pillow includes a ‘pricking’, pins, and bobbins. As bobbin lace became more popular and pins became more available, workers started using metal pins.
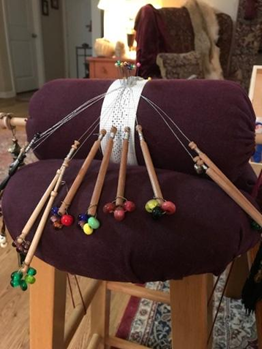
The bobbins were made of ivory, wood or bone and were hung in pairs around each pin shaft. Some bobbins were nothing more than a twig. Others are finely carved and are weighed with glass beads at the bottom. The bobbins, whatever they were made of, had an indent carved in the top part to accommodate a length of thread that was wrapped around and held in place with a double slip knot. One strand of thread (linen, gold or silver) accommodated two bobbins. One end of the thread would wrap around one bobbin and the other end of the thread wrapped around the other bobbin in the pair. This pair of bobbins was hung over a pin in the pricking. The hanging bobbins were placed on the pillow side by side as they hung over the pins. Creating the lace consisted of twisting and turning these bobbins and placing the pins in holes of the pattern according to the pricking as it was said earlier.
The pillow itself was usually held in a lap, on a table or placed on a specially made stool so that it was in front of the worker and could easily be accessed by both hands. As the lace was made it fell off the back of the pillow and was pinned in a roll until the desired amount was achieved. The way bobbin lace has been made has not changed since the 16th century. The pillow and bobbins may look different from person to person, and country to country, but the way were twisted and turned to create the lace stayed the same (21, Jackson).
The reason I made the bobbin lace pillow was to make bobbin lace trim for the gloves. It’s fashioned after many pillows described in England in the 16th Century (111, Palliser). This style of pillow is called a ‘muff’ style because it looks like the muffs that Elizabethan women used to keep their hands warm. The other style is a ‘bolster’ style which is a round pillow that can fit comfortably on a lap. I liked the style of the oval vs. round shape.
There is a description on how to make a bobbin lace pillow in Brigita Fuhrmann’s Bobbin Lace, an Illustrated Guide to Traditional and Contemporary Techniques. I used that as a guide but created my own final design suited to my purposes. To make this pillow, I started with a ¾ inch wooden dowel for the center. I attached one end of a strip of woolen blanket then wrapped the blanket around the dowel until the pillow was as thick as I wanted. I used a woolen blanket instead of sawdust and sand, to emulate the Elizabethan pillows that were stuffed with wool. I didn’t want to stuff it with sawdust or sand because if it ever ripped it would create a mess. The wool blanket allows the pins to enter and holds them firm. It also allows the pillow to be portable. I used a linen napkin to cover the wool blanket. I gave the pillow handles on each side by sliding on wooden knobs on each end of the dowel. When making lace and I’ve worked the pattern as far as it will allow and when it’s time to turn the pillow, I only pick the pillow up by these wooden knobs without disturbing the rest of the pillow.
My pricking is made of vellum parchment. I pre-pricked the holes for the pattern. The vellum does not rip and withstands many turns and pin pricks as the lace is made. The vellum is held on the pillow with pins pushed all the way in.
The pattern I use is called ‘Crown and Triangle’ and if you look at the lace I’ve already made, you will see a little crown in the pattern of the lace. I was given this pattern by Baroness Arianna in Atlantia then later found the same pattern in Bobbin Lacemaking, by Doris Southard. In the book they give credit to Woman’s Day Magazine, Copyright 1950. There are many lace patterns that have similar designs that look like little crowns and many references to ‘Crown’ lace in Elizabeth’s Wardrobe Unlock’d’ and Pallier’s History of Lace. That’s one of the reasons I like this pattern and love to use it on my gloves.
The bobbins are made of oak wood. I hand-carved each one. They are not fancy, but functional. I used oak because it is hardwood and can withstand the stress of the thread. To carve the wood I used a sharp blade and wood file. In all the bobbin samples described and shown in museums and books, I like the English bobbins best because they had little glass beads attached to the bottom. I made the glass beads that hang at the bottom of these bobbins specifically for the bobbins. They give the bobbins some weight and facilitate twisting and turning while working them easier.
In this pattern, I use modern silver cording. I cannot afford real silver thread. When using bobbins for this pattern, you work it in pairs. Silver and gold lace was just as popular as linen. I made silver lace to match the silver and blue theme of the glove.
1. Ribbon Lace – The pattern for the lace along the edge of the ruched ribbon was a simple pattern with the spangles added at regular intervals. I made a small tabletop version of my larger pillow for this lace. I did not use a pricking since it is a very simple pattern made with only two pairs of bobbins. It was based on examination of the lace on the edge of extant examples of lace on ruched ribbon of surviving Elizabethan gloves. The only downside was that I had to use modern silver embroidery floss in substitution for silver gilt thread which would have been used in the period as mentioned in the embroidery accounting. Silver gilt thread is a core white silk thread with silver foil wrapped around the silk. See picture.
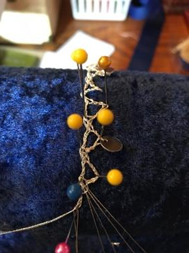
As described earlier in this documentation, bobbin lace is made by twisting and turning the bobbins that hold the thread, pinning at a designated time on the pricking, and twisting and turning for each segment until the lace is made. The bobbins hold the thread and are worked in pairs. The spangles (see section for Spangles) interspersed evenly along the edge of the lace, were grouped on one of the threaded bobbins and as the thread is twisted and turned to create the lace, a spangle is released and caught up in the twisting and turning, remains in the portion of the lace that is completed. The spangles used in this lace were bought because I did not have the time to make as many as I needed for the lace AND the embroidery. They are of the same material and design; metal disks with a small hole. I made 45 inches of lace for the ribbon for each glove.
2. Cuff Lace –
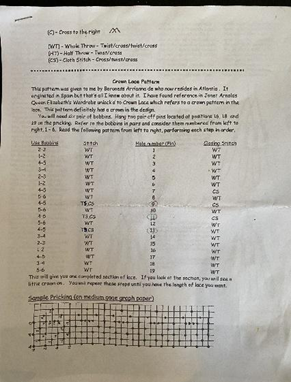
The lace on the edge of the cuff was made using a pattern called ‘crown lace’ as described above. This is why I chose this pattern for this glove (see pattern details in the picture). If you look closely at the lace, you will see a crown at intervals. I alternated putting a spangle on the loops at the top of the crown. Bobbin lace is seen on most of the extant examples in the V&A museum. I used my larger bobbin lace pillow (shown above) to make this lace. I used these bobbin lace tools I made to make the lace that are on the edge of the cuffs on the gloves. The spangles used in this lace were bought because I did not have the time to make as many as I needed for the lace AND the embroidery. They are of the same material and design; metal disks with a small hole. I made 20 inches of lace for each cuff.
d. Sewing the Finished Cuff to the Leather Glove
Embroidered cuffs were completed and compiled on separate ground, usually ‘sateen’ or silk, stiffened with paper or other stiffening agent and decorated before attaching them to the leather portion of the glove (Tiramani and North 157). The embroidery on the cuffs of the Elizabethan gloves were done by an embroiderer and after the work was done sent back to the glover. A lace-maker was hired to do the lace and they sent their work back to the glover who worked with a seamstress to sew all the pieces together. The glover employed these crafts but sewed the cuff to the leather portion of the glove and finished the product for final distribution (Ellis, 20).
The lace on the cuff of these Elizabethan gloves was sewed to the edge after the embroidery on the white satin was complete. I took an equal amount of blue satin to back the embroidery design and line the inside of the cuff, then used buckram inside to stiffen, then sewed the cuff to the leather portion of the glove with a 1/8” seam. I used a prix stitch, and you can see the seam on the inside of the glove. I normally would cover the seam with ribbon, but wanted to leave the seam since it did not cause any uncomfortableness when sliding my hand inside.
After the cuff and glove were joined, I sewed the ruched ribbon around the wrist portion and I already described how I did that, covering the seam of joining. I used silk thread for all the sewing. The bobbin lace was sewed to the cuff with metallic silver thread to enhance the decoration.
Summary
It is well established that crafts performed during the 15th and 16th century were guild driven and there were many rules for each. Each craft and the tools and materials used to complete their portion was not a skill of the glover. The glover may have started the process for the glove by selecting the leather and preparing the glove portion, but all the rest was ‘employed out’ as explained by Mr. Ellis in his book, Gloves and the Glove Trade. It stands to reason that for me to create a true Elizabethan glove today that I needed to learn the other crafts so I did. In some cases I made my own tools, such as the bobbin lace pillow and bobbins. This glove was made from many years of study and application for all aspects to be completed by me. I continue to learn detailed elements, like weaving the silk to make the ribbon like a ‘throwster’, or silk woman. Maybe my next glove I will have achieved this.
I hope you have enjoyed the verses as they were sung and appreciate the opera as I have presented it.
Bibliography
Arnold, Janet, ‘Queen Elizabeth’s Wardrobe Unlock’d’, W.S. Maney & Son, 1988
Ashelford, Jane, ‘Dress in the Age of Elizabeth I’, B.T. Batsford Ltd London, 1988
Beck, S. William, ‘Gloves, their Annals and Associates: A Chapter of Trade and Social History’, London: Hamilton, Adams & Co., 32, Paternoster Row. 1883
Bentham, Tanya, ‘Opus Anglicanum’, The Crowded Press Ltd, Ramsbury, Marlborough, Wiltshire SN8 2HR, 2021
Carey, Jacqui, ‘Elizabethan Stitches’, Carey Company, Ottery St Mary, Devon, UK, 2012
Close, Eunice, ‘How to Make Gloves’, Boston, Massachusetts, Charles T. Branform Company
Collins, C. Cody, ‘Love of a Glove’, Fairchild Publishing Company, 8 East 13th Street, New York, NY, 1947, Original Edition – 1945
Culpepper, Nicholas, ‘Culpepper’s Complete Herbal”, Union Square and Company, Sterling Publishing, 2019
Cumming, Valerie, ‘Gloves’, B.T. Batsford LTD, London, 1982
Davenport, Millia, ‘The Book of Costume’, Crown Publishers, Inc., New York 1976
Digby, George Wingfield, ‘Elizabethan Embroidery’, Thomas Yoseloff, Publisher, New York, 1964
Dubin, Lois Sherr, ‘The History of Beads’, Harry N. Abrams, Inc., 1987
Egan, Geoff and Pritchard, Frances, ‘Dress Accessories, 1150-1450’, Museum of London, 1991
Edwards, Isabel M., ‘Practical Glovemaking’, London, Parker Street, Kingsway, W.C.2, 1929
Ellis, B. Eldred, ‘Gloves and the Glove Trade’, London, Parker Street, Kingsway, W.C.2, 1921
Emelyn-Jones, Gwen, ‘How to Make Your Own Gloves’ (unknown publishing information)
Fuhrmann, Brigita, ‘Bobbin Lace, An Illustrated Guide to Traditional and Contemporary Techniques’, Dover Publications, Inc., New York 1976
Green, Anne, ‘Gloves, An Intimate History’, Reaktion Books, Ltd, Unit 32, Waterside 44-48 Wharf Road, London N1 7UX, UK 2021
Hoyt, Homer L., ‘Glassblowing’, Crafts and Arts Publishing Co. Inc., Golden, CO, 1989
Hull, William, ‘The History of the Glove Trade’, Nabu Press, 2012
Jargstorf, Sibylle, ‘Glass Beads from Europe’, Schiffer Publishing Ltd., 77 Lower Valley Road, Atglen, PA 19310, 1995
Jenkins, Cindy, ‘Making Glass Beads’, Lark Books, 50 College Street, Ashville, NC 28801, 1997
Latour, A., ‘Gloves’ Ciba Review #61, Basle, October 197
Leyland, N.L. and Troughton, J.E., ‘Glovemaking in West Oxfordshire’, Oxford City and County Museum Publication No. 4, 1974
Nevinson, John L., ‘Catalogue Of English Domestic Embroidery of the 16th and 17th Centuries’, V&A Museum Dept of Textiles, London, 1938
Ogden, Jack, ‘Jewelry Technology in the Ancient Medieval World’, Brynmorgen Press, 2023
Palliser, Mrs. Bury, ‘History of Lace (with 266 Illustrations)’, Dover Publications, Inc., New York, NY, 1984
Pritchard, Frances Editor, ‘Crafting Textiles’, Oxbow Books, 1950 Lawrence Road, Havertown, PA 19083 2021
Readers Digest, ‘Complete Guide to Needlework’, Readers Digest, Pleasantville, New York 1979
Redfern, W.B., ‘Royal & Historic Gloves & Shoes’, Lacis Publications, Berkeley, CA 04703, 2003
Redwood, Mike, ‘Gloves and Glove-Making’, Shire Publications, 2016
Rollins, J G., ‘Needlemaking’, Shire Album 71, Shire Publications, 1981
Severn, Bill, ‘Hand in Glove’, David McKay Company, Inc., New York, NY, 1965
Southard, Doris, ‘Bobbin Lacemaking’, Scribner, 1983
Staniland, Kay, ‘Medieval Craftsmen Embroiderers’, British Museum Press, London, WC1B 3QQ, 1993
V&A Publishing 2011, ‘Seventeenth Century Women’s Dress Patterns’, Victoria and Albert Museum, South Kensington, London, SW72RL, 2022
Willemsen, Annemarieke, ‘Honderden…Van hand tot hand’, Stichting Rijksmuseum van Oudheden, 2015
Wright, Thomas, ‘The Romance of the Lace Pillow’, H.H. Armstrong Olney Buck 1919, Reprint by Paul P.B. Minet, 1971
Personal Pictures/Video of Gloves in the Victoria and Albert Museum, 1991
Spangles | Historic Jamestowne
https://en.wikipedia.org/wiki/Oes
Museum Flyer, Museum of Costume, Bath – Gloves for Favours, Gifts and Coronations – 12 September 1987 – 13 March 1988
Threads Magazine, October/November 1988 ‘Handmaking Leather Gloves, Beginners guide to a disappearing art” by Jan Faulkner-Wagoner
The Worshipful Company of Glovers of London – www.glovers.org website
[1] The process of tanning a skin: Salted, soaked, depilation, beaming (removing the hair), more soaking, fleshing (removing the fatty tissue on the flesh side of the hide), soaking again, puering (process to render the hide soft and supple) dog manure used in the formula during medieval times, more washing, fermentation, drenching, scudding (small particles remaining removed with scraper), tawing (soaked in vat with 5 parts flour, 4 of alum, 2 of salt, and 1 egg-yolk), soaked again, stoved or dried (medieval times, the hides were spread on top of grass in the sun), staking (softens the stiffened leather) to prepare for use. Takes 9 months to complete. For full details see Chapter V, Skin-Dressing and Treatment, page 31, of Gloves and the Glove Trade by B. Eldred Ellis.